こんにちはhiro08です。お仕事でReact を使ってChrome Extensionを開発する機会がありました。初めはcreate-react-appをベースにしたプロジェクト構成で開発してましたが、Content ScriptsやBackground Scriptsを追加する時にwebpackのエントリーポイントを増やす必要がありました。
create-react-appでエントリーポイントを増やすにはeject(create-react-appの裏側で走っているwebpackなどを展開するコマンド)を実行する必要があります。しかしこれは構成が複雑化して、今後メンテナンスするときの負債になりそうでした。なので、一からwebpackのビルド設定して、要件によって柔軟に対応できるようにしました。この記事はその時の知見です。
テンプレートはGitHub上に置いてあります。
github.com
目次
前提
webpack ^4.41.2
typescript ^3.7.2
TypeScriptをベースにしていきます。
webpackのビルド設定
まずはReactをビルドするための環境を構築していきます。空のフォルダを作ってnpmを初期化しましょう。パッケージ管理はyarnを使っていきます。
$ yarn init -y
インストールするパッケージが多いですが、下記のTypeScriptとwebpackに関するパッケージをインストールします。
$ yarn add -D webpack webpack-cli html-loader css-loader html-webpack-plugin file-loader mini-css-extract-plugin awesome-typescript-loader mini-css-extract-plugin typescript @types/react @types/react-dom
そして、Reactを使うためのパッケージをインストールします。
$ yarn add react react-dom
ここからはwebpackのビルド設定に関するファイルを作ります。webpackの設定についてはあまり詳しく触れませんが、ここではsrcフォルダに入ったindex.tsxをエントリーポイントにして、distフォルダに出力する設定になっています。同時にhtml-webpack-pluginでpublicフォルダに入っているindex.htmlもdistフォルダに生成します。以下はコードの全体像です。
webpack.config.js
const webpack = require('webpack');
const HtmlWebPackPlugin = require('html-webpack-plugin');
const MiniCssExtractPlugin = require('mini-css-extract-plugin');

module.exports = {
    entry: {
    app: './src/index.tsx'
  },
  output: {
    path: __dirname + '/dist',
  },
  module: {
    rules: [
      {
        test: /\.tsx?$/,
        loader: 'awesome-typescript-loader',
      },
      {
        test: /\.html$/,
        use: [
          {
            loader: 'html-loader',
            options: {minimize: true},
          },
        ],
      },
      {
        test: /\.css$/,
        use: [MiniCssExtractPlugin.loader, 'css-loader'],
      },
    ],
  },

  plugins: [
    new HtmlWebPackPlugin({
      template: './public/index.html',
      filename: './index.html',
      chunks: ['app'],
    }),
    new MiniCssExtractPlugin({
      filename: '[name].css',
      chunkFilename: '[id].css',
    }),
  ],
};
こちらがtsconfig.jsonの設定ファイルです。
tsconfig.jsonの作成
{
  "compilerOptions": {
    "outDir": "./dist/",
    "allowSyntheticDefaultImports": true,
    "sourceMap": true,
    "noImplicitAny": true,
    "module": "esnext",
    "moduleResolution": "node",
    "target": "es5",
    "lib": ["es5", "es6", "dom"],
    "jsx": "react"
  },
  "include": ["./src/**/*"]
}
publicフォルダを作成して、その中にindex.htmlを作成します。
public/index.html
<!DOCTYPE html>
<html lang="ja">
  <head>
    <meta charset="utf-8">
    <title>react-chrome-extension</title>
  </head>
  <body>
    <div id="root">
    </div>
  </body>
</html>
エントリーポイントのファイルを作ります。srcフォルダを作成して、index.tsxを作成します。
src/index.tsx
import React from 'react';
import ReactDOM from 'react-dom';

const App = () => <div>App</div>;

ReactDOM.render(<App />, document.getElementById('root'));
package.jsonにビルドするためのスクリプトを追加します。
package.json
  //追加
  "scripts": {
    "build": "webpack --mode production --config webpack.config.js"
  }
これでwebpackでReactをビルドするための最低限の設定ができました。一度ビルドできるか確かめてみましょう。
$ yarn build

ビルドが成功すると、distフォルダが出来ており、中にはindex.htmlとapp.jsが作成されています。
Chrome Extension開発の第一歩
Chrome Extensionを開発して公開するには、manifest.jsonを作る必要があります。
Chrome Extensionに関するドキュメントはこちらにあります。
developer.chrome.com
manifest.jsonもindex.htmlと同様publicフォルダに作成して、ビルド時にdistフォルダにコピーしてあげます。
$ yarn add -D copy-webpack-plugin
public/manifest.json
{
  "manifest_version": 2,
  "version": "0.0.1",
  "short_name": "react-chrome-extemsion",
  "name": "sample",
  "description": "sample",
  "browser_action": {
    "default_popup": "index.html"
  },
  "content_security_policy": "script-src 'self' 'unsafe-eval'; object-src 'self'"
}
copy-webpack-pluginを読み込ませて、プラグインを使うための設定をします。
webpack.config.js
const CopyPlugin = require('copy-webpack-plugin');
  plugins: [
    new HtmlWebPackPlugin({
      template: './public/index.html',
      filename: './index.html',
      chunks: ['app'],
    }),
    //追記
    new CopyPlugin([{from: './public/manifest.json', to: 'manifest.json'}]),
  ],
これでビルドしてみます。
$ yarn build
distフォルダにmanifest.jsonが出力されているのがわかります。

Chrome Extensionで拡張機能を読みこむ
それでは実際にChromeの拡張機能として使ってみましょう。Chromeの右はじのタブから
その他のツール>拡張機能をクリック。
そこからデベロッパーモードをオンにしてください。
そして、パッケージ化されていない拡張機能を読み込みをクリックします。

先ほどビルドしたdistフォルダを読み込ませてください。
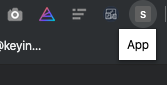
するとポップアップでReactのアプリケーションの内容を表示できました。
これでReactでChrome Extensionを開発する土台ができました。
Background Scripts
次にBackground Scriptsを追加します。Background ScriptsはChromeが起動している間バックグラウンドで常に実行しているスクリプトになります。Background Scriptsを使うためにmanifest.jsonに追記していきましょう。
manifest.json
  //追記
  "background": {
    "scripts": ["background.js"]
  },
webpackのエントリーポイントにbackground.tsを追加。しかしtsxではなくtsな点に注意してください。
webpack.config.js
  entry: {
    app: './src/index.tsx',
    //追加
    background: './src/background.ts',
  },
Background Scriptsの内容を書きます。ここではconsole上にtestとだけ表示する簡単な記述にします。
src/background.ts
console.log('test');
これでBackground Scriptsが出来ました。再度ビルドしてみます。
$ yarn build
distの中にbackground.jsが作成されました。

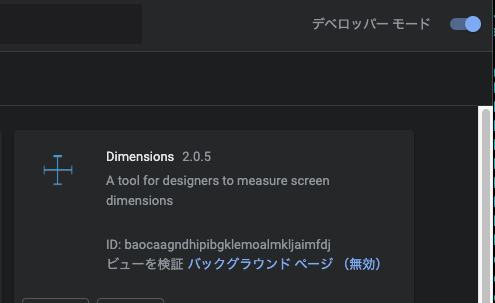
すでに拡張機能が読み込まれてるので、リロードするだけで反映されます。すると、バックグラウンド ページからBackground Scriptsが読み込まれてるのがわかります。

Content Scripts
次にContent Scriptsを開発するための環境を整えます。Content Scriptsは特定のページで読み込むことができるScriptを設定できます。
./src/contents.tsx
import React from 'react';
import ReactDOM from 'react-dom';

import './contnets.css';

const Main = () => {
  return <div>App</div>;
};

const app = document.createElement('div');
app.id = 'my-extension-root';
document.body.appendChild(app);
ReactDOM.render(<Main />, app);
Content Scriptsで読みこませるCSSを書きます。
./src/contents.css
body {
  color: red;
}
そして、Background Scriptsと同様にエントリーポイントを追加します。
  entry: {
    app: './src/index.tsx',
    background: './src/background.ts',
    contents: './src/contents.tsx',
  },
/public/contents.html
<!DOCTYPE html>
<html lang="ja">
  <head>
    <meta charset="utf-8">
    <title>react-chrome-extension</title>
  </head>
  <body>
    <div id="root">
    </div>
  </body>
</html>
manifest.json
  "content_scripts": [
    {
      "matches": ["http://*/*", "https://*/*"],
      "js": ["contents.js"],
      "css": ["contents.css"]
    }
  ],
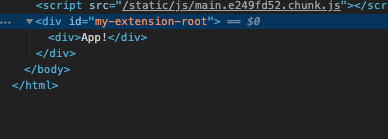
Chrome developer toolでみてみると、Content Scriptsが読み込まれてるのがわかります。
ホットリロードを追加する
開発時にいちいちビルドして、Chrome Extensionを読み込ませるのは少々面倒臭いです。そのため、ホットリロードを効かせて、変更をすぐに反映させる設定をしていきます。webpackのライブラリを探してところ、下記のライブラリが使えそうでした。早速インストールしてみましょう。webpack-mergeを使えば、プロダクション環境と開発環境を分けることができます。
github.com
$ yarn add -D webpack-extension-reloader webpack-merge
そして、webpack.dev.jsを作ります。
webpack.dev.js
const merge = require('webpack-merge');
const path = require('path');
const base = require('./webpack.config.js');
const ExtensionReloader = require('webpack-extension-reloader');

module.exports = merge(base, {
  mode: 'development',
  watch: true,
  entry: {
    'content-script': './src/contents.tsx',
    background: './src/background.ts',
  },
  plugins: [
    new ExtensionReloader({
      manifest: path.resolve(__dirname, './public/manifest.json'),
      port: 3001,
      reloadPage: true,
      entries: {
        contentScript: 'content-script',
        background: 'background',
      },
    }),
  ],
});
ホットリロードするためのコマンドを追加してください。
  "scripts": {
    "build": "webpack --mode production --config webpack.config.js",
    //追加
    "dev": "webpack --config webpack.dev.js --watch"
  }
これでホットリロードを使った開発環境を構築することができました。早速使ってみましょう。
$ yarn dev
ホットリロードが適用されているか適当にコンテンツを変えてみましょう。
index.tsx
const App = () => <div>App!</div>;
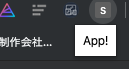
無事に変わりました!!
ただし注意が必要な箇所あります。ローカルのサーバーを止めるとChrome Extensioinにエラーが吐かれるので、注意が必要です。一旦プラグインを無効にして、再度ビルドしてから拡張機能を読み込ませてください。この辺もし解決策があれば追記していきます。

最後に
ReactでChrome Extensionを開発する環境が一通り整いました。ReactでChrome Extensionを開発できるテンプレートは非常に少ないので、ぜひ使ってみてください。
github.com
参考
https://github.com/samuelsimoes/chrome-extension-webpack-boilerplate